2.5 Setting up credential profiles for FIDO authenticators
You must set up one or more credential profiles for your FIDO authenticators.
The options you select depend on whether you intend to request the FIDO authenticator through the MyID Operator Client or through the Self-Service Request Portal.
2.5.1 Setting up a FIDO credential profile for the MyID Operator Client
To set up a credential profile for FIDO authenticators that you can use for requests made in the MyID Operator Client:
-
Log on to MyID Desktop as an administrator.
-
From the Configuration category, select Credential Profiles.
-
Click New.
-
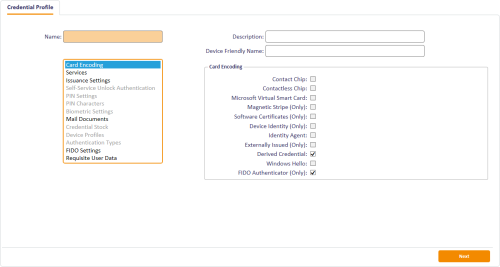
In the Card Encoding list, select FIDO Authenticator (Only).
Note: The other options are disabled. The Derived Credential option is not disabled; however, it is used only for requests made through the Self-Service Request Portal. See section 2.5.2, Setting up a FIDO credential profile for the Self-Service Request Portal.

-
In the Services section, you can set the following:
-
MyID Logon – select this option if you want to be able to log on to MyID with the authenticator.
Note: The MyID Encryption option is disabled. You cannot use a FIDO Authenticator to store an encryption certificate.
-
-
In the Issuance Settings section, the following options are available:
-
Validate Issuance
-
Validate Cancellation – do not select this option. Validating cancellation is not supported with FIDO authenticators, and setting this option may result in being unable to cancel the device.
-
Lifetime
-
Credential Group
-
Block Multiple Requests for Credential Group
-
Cancel Previously Issued Device
-
Enforce Photo at Issuance – do not select this option. Request checks are performed for FIDO authenticators, but issuance checks are not; instead of standard MyID issuance, authenticators use a FIDO-specific registration process.
-
Notification Scheme
-
Require user data to be approved
See the Working with credential profiles section in the Administration Guide for details of these options.
You must also set the following option:
-
Generate Code on Request – set this to one of the following options:
-
Simple Logon Code – the FIDO registration code is generated using the complexity rules as defined by the Simple Logon Code Complexity configuration option on the Auth Code tab of the Security Settings workflow.
By default, this is 12-12N, which means a 12-digit number.
-
Complex Logon Code – the FIDO registration code is generated using the complexity rules as defined by the Complex Logon Code Complexity configuration option on the Auth Code tab of the Security Settings workflow.
By default, this is 12-12ULSN[BGIlOQDSZ], which means a 12-character code containing upper case, lower case, special characters, and numbers, and a set of commonly-confused characters excluded.
Important: Do not select None. MyID must generate a FIDO registration code to be used in the FIDO authenticator registration process.
For more information about the format of these codes, see the Setting up logon codes section in the Administration Guide.
-
-
-
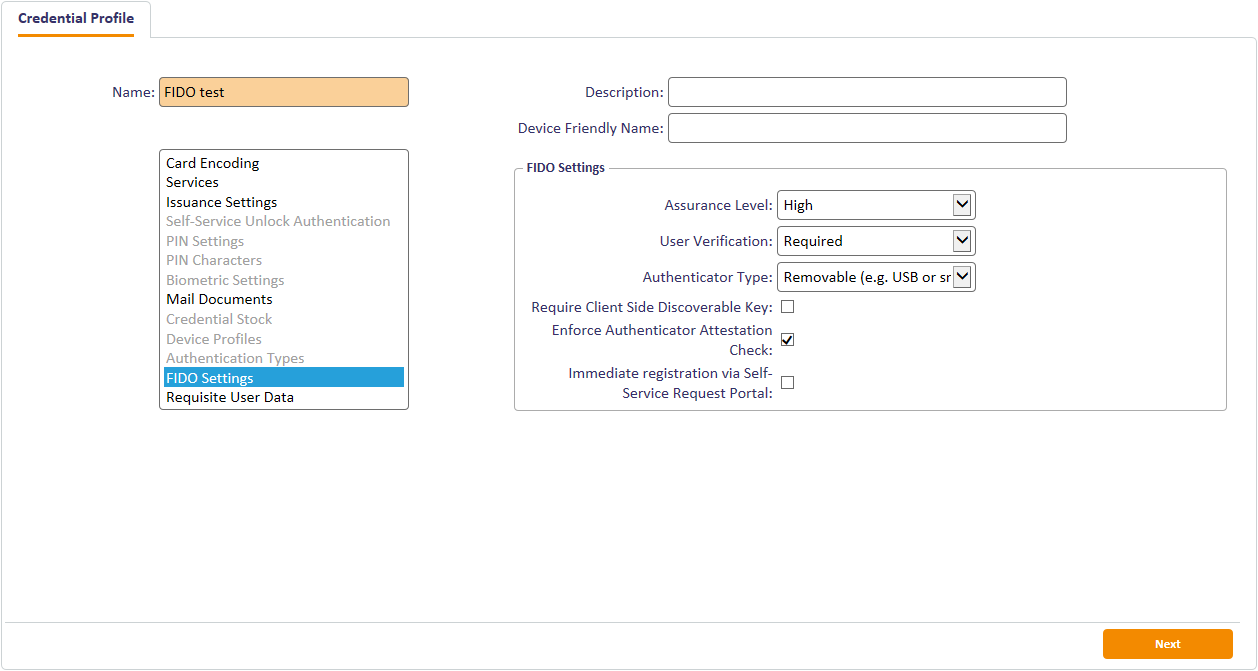
In the FIDO Settings section, set the following:

-
Assurance Level – select one of the following options:
-
Basic – the FIDO authenticator uses single factor authentication, and is suitable for use with some external systems, but not for access to crucial systems.
-
High – the FIDO authenticator uses multi-factor authentication, and is suitable for use with secure systems, such as logging on to MyID.
You are recommended to set Assurance Level to High only when you have also set the User Verification to Required.
MyID differentiates between FIDO authenticators that have been issued with a credential profile where the Assurance Level is set to Basic or High – for example, you can enable logon to MyID for FIDO High Assurance, but disable logon for FIDO Basic Assurance. See section 2.7, Configuring MyID for FIDO logon for details.
-
-
User Verification – select one of the following options:
-
Required – the FIDO authenticator supports two-factor authentication. If the authenticator does not support two-factor authentication, it cannot be registered.
-
Preferred – the FIDO authenticator will use two-factor authentication if the authenticator supports that feature, but will still be registered if it supports only one-factor authentication.
-
Discouraged – the FIDO authenticator will use single-factor authentication, unless the authenticator cannot work without multi-factor authentication.
-
-
Authenticator Type – select one of the following options:
-
Internal – you can issue this credential profile to internal FIDO authenticators; for example, authenticators included in mobile devices such as cell phones.
-
Removable – you can issue this credential profile to external removable authenticators; for example, USB tokens or smart cards.
-
Internal or Removable – you can issue this credential profile to internal or removable FIDO authenticators.
-
-
Require Client Side Discoverable Key – select this option to ensure that the FIDO authenticator supports Resident Keys. If you select this option, and the FIDO authenticator supports client side discoverable keys, you can choose not to provide the username manually when using the FIDO authenticator to log on to MyID; see section 3.4, Logging on to MyID with FIDO authenticators.
-
Enforce Authenticator Attestation Check – select this option to carry out an authenticator attestation check during the registration process.
-
Immediate registration via Self-Service Request Portal – used only for requests made through the Self-Service Request Portal. See section 2.5.2, Setting up a FIDO credential profile for the Self-Service Request Portal.
-
-
In the Requisite User Data section, set any user attributes that you want to require for the people who will request FIDO authenticators.
For example, as the FIDO notification is sent as an email, you are recommended to select Email in the Required for Request column.
If you have configured your system to send the registration code in an SMS, you are recommended to select Mobile in the Required for Request column.
For more information about this features, see the Requisite User Data section in the Administration Guide.
-
Click Next.
-
In the Select Roles screen, select the roles you want to be able to receive, request, or validate FIDO registrations.
-
Make sure that people who will receive the FIDO authenticator have a role that is selected in the Can Receive list.
-
Make sure that operators who will request FIDO authenticators have a role that is selected in the Can Request list.
-
If you have selected the Validate Issuance option, make sure that operators who will approve requests for FIDO authenticators have a role that is selected in the Can Validate list.
Note: You do not need to select any roles in the Can Collect list. Collecting FIDO authenticators is carried out by the person who is receiving the authenticator using a self-service registration process.
-
-
Click Next.
-
Type your Comments, then click Next to save the credential profile and complete the workflow.

2.5.2 Setting up a FIDO credential profile for the Self-Service Request Portal
To set up a credential profile for FIDO authenticators that you can use for requests made in the Self-Service Request Portal:
-
Log on to MyID Desktop as an administrator.
-
From the Configuration category, select Credential Profiles.
-
Click New.
-
In the Card Encoding list, select the following:
-
Derived Credential
-
FIDO Authenticator (Only)
Note: The other options are disabled.
-
-
In the Services section, you can set the following:
-
MyID Logon – select this option if you want to be able to log on to MyID with the authenticator.
Note: The MyID Encryption option is disabled. You cannot use a FIDO Authenticator to store an encryption certificate.
-
-
In the Issuance Settings section, the following options are available:
-
Validate Issuance
-
Validate Cancellation – do not select this option. Validating cancellation is not supported with FIDO authenticators, and setting this option may result in being unable to cancel the device.
-
Lifetime
-
Credential Group
-
Block Multiple Requests for Credential Group
-
Cancel Previously Issued Device
-
Enforce Photo at Issuance – do not select this option. Request checks are performed for FIDO authenticators, but issuance checks are not; instead of standard MyID issuance, authenticators use a FIDO-specific registration process.
-
Notification Scheme
-
Require user data to be approved
See the Working with credential profiles section in the Administration Guide for details of these options.
You must also set the following option:
-
Generate Code on Request – set this to one of the following options:
-
Simple Logon Code – the FIDO registration code is generated using the complexity rules as defined by the Simple Logon Code Complexity configuration option on the Logon tab of the Security Settings workflow.
By default, this is 12-12N, which means a 12-digit number.
-
Complex Logon Code – the FIDO registration code is generated using the complexity rules as defined by the Complex Logon Code Complexity configuration option on the Auth Code tab of the Security Settings workflow.
By default, this is 12-12ULSN[BGIlOQDSZ], which means a 12-character code containing upper case, lower case, special characters, and numbers, and a set of commonly-confused characters excluded.
Important: Do not select None. MyID must generate a FIDO registration code to be used in the FIDO authenticator registration process.
For more information about the format of these codes, see the Setting up logon codes section in the Administration Guide.
-
-
-
In the FIDO Settings section, set the following:
-
Assurance Level – select one of the following options:
-
Basic – the FIDO authenticator uses single factor authentication, and is suitable for use with some external systems, but not for access to crucial systems.
-
High – the FIDO authenticator uses multi-factor authentication, and is suitable for use with secure systems, such as logging on to MyID.
You are recommended to set Assurance Level to High only when you have also set the User Verification to Required.
MyID differentiates between FIDO authenticators that have been issued with a credential profile where the Assurance Level is set to Basic or High – for example, you can enable logon to MyID for FIDO High Assurance, but disable logon for FIDO Basic Assurance.
-
-
User Verification – select one of the following options:
-
Required – the FIDO authenticator supports two-factor authentication. If the authenticator does not support two-factor authentication, it cannot be registered.
-
Preferred – the FIDO authenticator will use two-factor authentication if the authenticator supports that feature, but will still be registered if it supports only one-factor authentication.
-
Discouraged – the FIDO authenticator will use single-factor authentication, unless the authenticator cannot work without multi-factor authentication.
-
-
Authenticator Type – select one of the following options:
-
Internal – you can issue this credential profile to internal FIDO authenticators; for example, authenticators included in mobile devices such as cell phones.
-
Removable – you can issue this credential profile to external removable authenticators; for example, USB tokens or smart cards.
-
Internal or Removable – you can issue this credential profile to internal or removable FIDO authenticators.
-
-
Require Client Side Discoverable Key – select this option to ensure that the FIDO authenticator supports Resident Keys. If you select this option, and the FIDO authenticator supports client side discoverable keys, you can choose not to provide the username manually when using the FIDO authenticator to log on to MyID
-
Enforce Authenticator Attestation Check – select this option to carry out an authenticator attestation check during the registration process.
-
Immediate registration via Self-Service Request Portal – select this option if you want to register the authenticator immediately when the cardholder makes the request in the Self-Service Request Portal. If you do not select this option, MyID sends the standard registration messages, and the person can register their authenticator later.
-
-
In the Requisite User Data section, set any user attributes that you want to require for the people who will request FIDO authenticators.
For example, if you are not using immediate registration, as the FIDO notification is sent as an email, you are recommended to select Email in the Required for Request column.
If you have configured your system to send the registration code in an SMS, you are recommended to select Mobile in the Required for Request column.
For more information about this features, see the Requisite User Data section in the Administration Guide.
-
Click Next.
-
In the Select Roles screen, select the Derived Credential Owner role for each of the following:
-
Can Receive
-
Can Request
-
Can Collect
Note: You do not need to select any of the roles held by the person who will receive the FIDO registration request.
-
-
Click Next.
-
Type your Comments, then click Next to save the credential profile and complete the workflow.
